XORP Live CD
The XORP Live CD is a bootable CD for x86 PCs.
The Live CD serves a number of purposes:
- It's an easy way to try out XORP without needing to compile anything or reformat the disk on your PC.
- It's a quick way to get a relatively secure router on demand.
- It's a great tool for a student lab session, requiring no installation.
This page provides the following information about the XORP Live CD:
Getting the Live CD
XORP version: Release-1.6
Download
(http,
bittorrent)
the Live CD ISO compressed image (44 MB).
Or try the nearest mirror site.
MD5 (XORP-1.6-LiveCD.iso.gz) = 62714f30ffa242c046e11963bbfae9a9
Once you've downloaded the CD image, you will need to burn it using a CD-R or CD-RW drive. Some instructions on how to burn CD images are available:
- Instructions for Mac OS X.
- Instructions for Windows.
- Instructions for Linux using cdrecord (aka cdrtools). cdrtools also works on FreeBSD and can be installed from ports.
- Instructions for FreeBSD using burncd. The burncd program comes with FreeBSD and to burn a CD in an an ATAPI CD drive, you can simply run:
burncd -f /dev/acd0c -e data XORP-1.5-LiveCD.iso fixate
Running the Live CD
To boot from the Live CD, your PC needs to have the CD-ROM device set as the primary boot device. If this is not already the case, you will need to modify the settings in the BIOS. The boot order should along the lines of:
- CD drive.
- Floppy Disk.
- Hard Disk.
If you want the router to store any configuration changes you have made when it is rebooted, you'll also need a USB disk, but you can try the Live CD without this.
Then reboot the PC. The PC should boot from the CD. Normally it will display the FreeBSD boot-time console for 30 seconds to a minute while booting completes. Sorry - there's no progress bar to let you know anything is happening.
If you've got a USB disk connected to the machine, and you've done this before, then the XORP configuration will be copied into the memory filesystem, along with passwords, sshd keys, etc. Then the XORP routing protocols will be started.
If there's no USB disk connected, or it doesn't have the files on it that XORP expects, then a simple interactive script will run to allow you to configure passwords and decide which network interfaces you want XORP to use.
Starting XORP the First Time
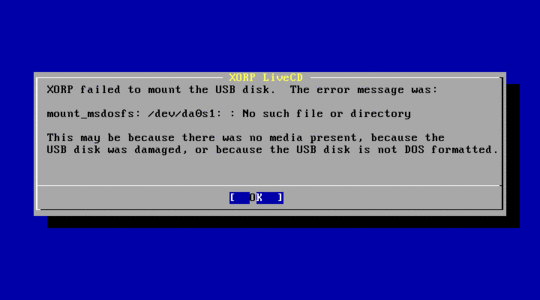
The startup script that runs the first time you run XORP is quite simple. If there's no USB disk connected, or it's not DOS-formatted, you'll be presented with a warning similar to this one:
Hit enter, and you'll be given the following choices:
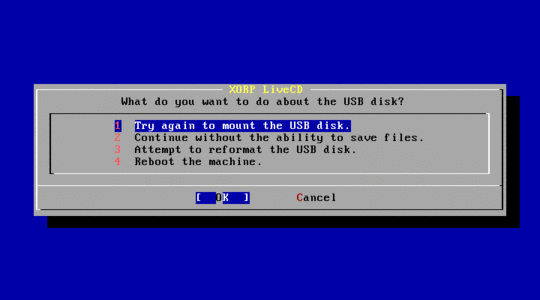
Use the cursor keys to move up and down to choose an option, and hit enter.
If no USB disk is connected, you can add one now, and select 1.
If your USB disk is not DOS formatted, you can reformat it (erasing all the data on it) by selecting 3.
If you don't have a USB disk to hand, you can continue by selecting 2; but you won't be able to preserve any configuration changes you make later, unless you later connect a USB disk and use the usb_save command.
If you now have a writable, DOS formatted USB device connected, hit Enter, and you will be prompted to enter the root password for the FreeBSD system. This will allow you to login to the machine as the superuser to diagnose any problems, or to see how XORP works behind the scenes.
Next you will be prompted to enter the password for the "xorp" user account. On a normal XORP router, you might have many user accounts for the different router administrators, but on the Live CD we just create one user called "xorp". Please do enter a reasonable password, as this user will be able to login over the network using the ssh secure shell and this password.
Finally you will be prompted as to which network interfaces you wish XORP to manage. These interfaces will show up in the default XORP configuration file, ready to have IP addresses assigned. The menu looks like:
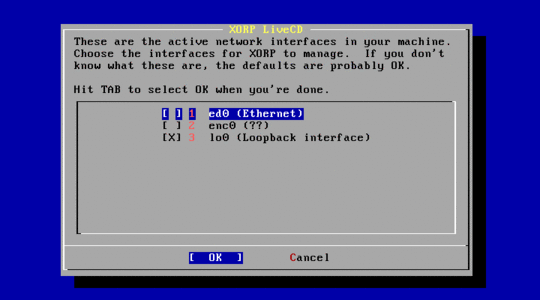
Typically you will only want XORP to manage Ethernet interfaces and the loopback interface from the Live CD at this stage, because currently XORP has no built-in support for dial-up links. Move up and down using the cursor keys, and hit space to select or unselect an option (an "X" implies the option is selected). When you are finished, hit Tab, to select the "OK" button, and hit Enter.
That's it. XORP will now finish booting.
Once XORP has finished booting, you will be presented with a login prompt, and you can login to XORP as the "xorp" user with the password you have chosen, and interact with the XORP command line interface to complete the configuration, assign IP addresses, etc.
Live CD quirks
Saving Config
The location of the router configuration file used by XORP can be set using command line parameters, so different XORP systems might choose to use a different location for this file. On the Live CD, the configuration file is stored in /etc/local/xorp.conf
If you change the router configuration using the XORP shell, and want to save it, you need to enter the following in configuration mode:
xorp@LiveCD# save /etc/local/xorp.conf
If you want to preserve the configuration on a USB disk, either use the usb_save command from the UNIX shell, or use the following command in the XORP shell's operational mode:
xorp@LiveCD> usb save
Interface Naming
If you're used to Linux, you may be surprised that FreeBSD names it's Ethernet interfaces with names like fxp0, fxp1, dc0 and xl3, rather than eth0, eth1, etc. The advantage is that you can tell exactly what the device driver is that's being used, and that if you know you have one Intel 10/100 and one DEC Tulip in the machine, you know they'll be called fxp0 and dc0, no matter which PCI slot they're in. The disadvantage is that it's more confusing for beginners who don't want to know this detail.
Some people get religious about such things. We don't - this just reflects the underlying operating system's naming convention. If you ran XORP on Linux, you'd see eth0, etc.