
...making Linux just a little more fun!
The first part of this article introduced the basic idea of using an inexpensive USB stick instead of a laptop for home/work demands. This part turns the bare-bones script (a glorified wrapper around tar) into a robust, conveniently usable day-to-day solution.
One of the main drawbacks of the basic version is that one has to explicitly state the maximum age of files (--days x option), and this is the first thing that can/will go wrong - especially when synchronising only once in a while. Imagine taking your last batch of files home, going on vacation and then coming back after some weeks. The question then is 'When was it I last synced my files from work ... 3 days or ... wait a minute ... could be 5 ... better make it 7?' This is tedious, therefore a timestamping mechanism is implemented.
The second aspect that complicates usage is that directories can be synchronised as they grow, but not as they shrink - and this is again tedious to keep track of. A simple script to automate this process is presented.
The remainder of this article contains brief discussions of further add-ons. These can be used as-is, but the intention is rather to illustrate that a usable solution requires neither expensive hardware nor complicated programs.
|
Category: File synchronisation
Imagine taking your last batch of files home, going on vacation and then coming back after some weeks. The question then is 'When was it I last synced my files from work ... 3 days or ... wait a minute ... could be 5 ... better make it 7?' |
To recap the last part, the main script uses a configuration file, $config, which stores (tagged) names of directories or files that are to be tracked. A good idea is to put it in a fixed location (e.g., /etc/pack.list), and allow all USB stick users write access to that file. Then, it is possible to simply add a new directory, in the following manner:
pwd >> /etc/pack.list
To resolve the question 'But how do I keep my configuration files themselves synchronised?', a second level of configurability is implemented in form of the essential() routine. It provides robustness against overwriting by tracking a few selected, important files - among these $config itself:
sub essential {
  open( ESSENTIAL, ">$tmpconf") || die "can't store essential files in $tmpconf: $!\n";
  print ESSENTIAL "/home/gerrit/.{bash?[place]*,alias,functions,dircolors}\n";
  # ...
  print ESSENTIAL "${config}\n";
  close ESSENTIAL;
}
An alternative is to always carry around the configuration file list on the stick. There is support for such a solution: a directory $confdir = $flashdir/.conf.d exists, and is heavily used by the other functions that will now be discussed.
It is easy to get the number of days (in the --days x option) wrong, and then one ends up with stale files - a nuisance. The timestamping mechanism is superior to the day-wise backup, and makes the usage much simpler. It is based on recording a timestamp value in a file, much like the files anacron(8) uses. The important bits are:
If you look inside the timestamp file, there is just a single number (epoch time in seconds). It is easy to make the contents human-readable:
alias seconds_to_timestring="perl -le 'for (<STDIN>) { print \$_=localtime(\$_) }'"

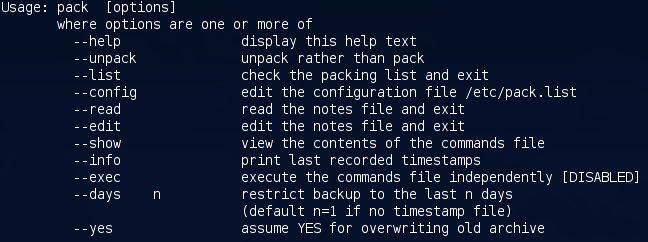
With pack --info, you can see timestamps of all hosts you use; here is an example screenshot. (The script recognises which timestamp is local.) To bootstrap this mechanism, the --days x option is still needed - once, for initial creation of timestamps.
Since several functions (archive label and timestamping) depend on distinct hostnames, the source and target PCs should use different ones (e.g., not both 'localhost.localdomain').
An archive can only transport, not delete, files. While it is not possible to mimic the --delete flag of e.g. rsync, a useful approximation is possible, and not too complicated to implement. It is based on executing commands that change the structure of directories (e.g., new owners, file deletion, file access times ...) locally and, when successful, recording them for later use. The principle is simple: in essence, the script does the following:
cmds=$confdir/commands
while read -p'#' line; do  eval $line && echo $line >> $cmds; done
The actual script is a bit more sophisticated: it keeps track of the current working directory (as most commands use relative, not absolute directory names); performs alias expansion; and uses 'su' to track file ownership.
The output generated by this script is in turn an executable, 'write-once-execute-once', shell script. If you supplied such a file in $confdir, pack will automatically execute it within the execute_cmds() routine - which looks like this:
sub execute_cmds {
  (-s $cmds) || return;             # ignore empty files
  # ...
  system "bash $cmds";              # execute commands
  system "mv $cmds /tmp/commands";  # store in /tmp
}
To merely see what would happen (without executing), you can use pack --show.
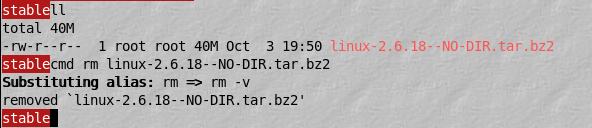
Here is an example
where a kernel is removed both locally and remotely (the remote side
is shown further below). When using such a script, asterisks and
other shell-special characters need to be escaped, as shown in this example.
Often the one-off situation arises to just carry some files home once, e.g., some source files or PDF files to read. To provide a simpler alternative to day-to-day tracking, there are two archives with special names that will automatically be unpacked:
The former is useful if there is overlap with files that are already tracked; the latter is a good all-round default. The convenience of this solution is the automatic unpacking via the script - no more forgotten archives. To create either of the two files, use the -j option (bzip2 compression) and the -P option (to not strip leading '/') with tar. For example, I often do this:
tar -jcpPvf /vol/flash/add.2 /usr/src/patches/ /home/bin
|
Category: Security
Using a synchroniser system, potentially with command execution, short-circuits all the hard work other hackers have done to make your Linux box a safe place. |
Archives of tracked files need to be unpacked before any running program has a chance of overwriting them. Un-packing is thus best performed either at boot-time or before the window manager starts. KDE for instance provides a place for such executables in ~/.kde/Autostart. Since not everyone uses KDE, I will present the former alternative.
But not without a BIG FAT WARNING: Using a synchroniser system, potentially with command execution, short-circuits all the hard work other hackers have done to make your Linux box a safe place. A malicious 'bad guy' could feed your computer garbage archives or venomous scripts which render your system unusable.
At the very least, use some form of authorization; a simple, but efficient, variant is presented below. The automatic unpack script is a standard SysV init script; place or symlink it into /etc/init.d and create a symlink for the appropriate runlevel. (On my Debian box, I use /etc/rc2.d/S30unpackUSB, RH/Fedora are similar and there is chkconfig support.) When invoked with the `start' argument at boot-time, the script will:
The authentication mechanism uses a MD5 hash of a well-known file. (Below, it is the script itself.)
idfile=$confdir/.idfile
serialnum=$confdir/.serialnum
md5sum $0 | tee ${serialnum} | tee "$(<${idfile})"
The $serialnum will be automatically created in $confdir. The $idfile contains the location (absolute path) of some file known only to the user. This file must be manually edited (e.g. echo `pwd`/mysecretfile > $idfile). The trick is that the file pointed to by $idfile contains the same hash value as the $serialnum. Hence, the following happens at script invocation time:
if ! [ -e "${serialnum}" -a -e "${idfile}" ] || [ "$(<$(<${idfile}))" != "$(<${serialnum})" ]
then
   echo "Authentication procedure failed." >&2
   exit 1
fi
This means if some malicious other person tries to compromise your computer with his forged USB stick, the process will fail if (1) there is no $serialnum on the stick, (2) there is no $idfile on the stick. Both of these could be accomplished but cost hacking and spoofing effort, and more protection is provided by number (3):
"$(<$(<${idfile}))" != "$(<${serialnum})"
Translated: 'The contents of the file pointed to by $idfile must match the contents of $serialnum'. To accomplish this, intrusive hacking is needed. If you are paranoid about security (sometimes not a bad idea), you can disable this mechanism entirely. Statistically speaking, however, the theft of a laptop is far more likely than such a planned intrusion.
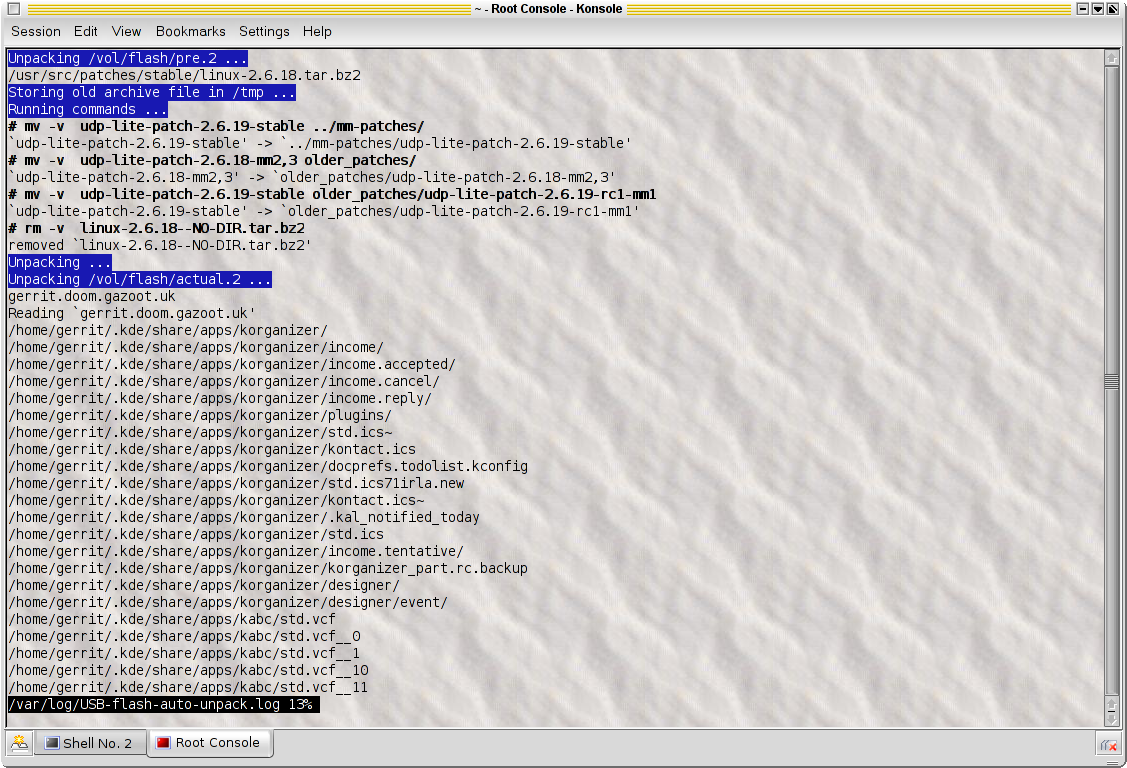
Returning to the above screenshot with the local removal of a kernel, this screenshot shows the log of what subsequently happened on the remote computer. First the 'pre.2' file (a new kernel) is unpacked, followed by command execution (where the old kernel is removed), finally the main archive is unpacked.
The next extension is a kind of personal organiser for taking day-to-day notes such as important things to do, buy, or organise; telephone numbers and URLs that are not to be forgotten; and the like. It is actually very useful, as everything is in one place.
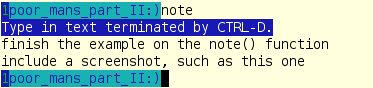
Palmtops are horribly and unnecessarily expensive. Let's code a part of their luxuriant functionality by storing notes in $confdir; here is an example screenshot. Since there are so many scripts already, a (bash) shell function is used for a change:
function note() {
   test -t 0  &&  echo "Type in text, terminated by CTRL-D."
   if note=$(fold -s) && test -n "$note";  then
      echo "at $(date): ${note}"  >>/vol/flash/.conf.d/notes
   fi
}
The first test checks if input is from a keyboard (terminal) and prints
a prompt if so. Otherwise, it will simply pipe from stdin into the
file. This allows very practical uses such as the following:
echo "CVS commit ID was $(cat /tmp/commit-id), done at $(date)" | note
To make this a complete system, convenient access to the notes is required. One is built into the script already: notes can be accessed using pack --read. More convenient is an Autostart script (placed in ~/.kde/Autostart). This has the following core:
kedit --caption "PACK NOTES" $notes &This can easily be changed to suit your individual text viewer/editor of choice.
Nowadays, hard drive sizes of up to 500GB are no exception. However, on any such disk there are 64 bytes which, when corrupted, can create a real hell for an afternoon or two - the partition table, located in the MBR. I've experienced it more than once that an MBR became damaged at some time. I wouldn't wish the painful process of restoration to anyone.
[ ...but see "Clearing out the Master Boot Record" in issue 63. Perhaps this will convince you of the necessity of following Gerrit's advice, if nothing else will. :) -- Ben ]
Code to save the MBR on the stick is easy enough to add. Procedure save_mbr is invoked before creating the archive and will copy the MBR into $confdir. It uses rdev(8) to determine your root device:
sub save_mbr {
  my $rdev = qx{/usr/sbin/rdev 2>&1};
  # ...
  system("dd if=$rdev of=$mbr bs=512 count=1") == 0 ||  warn "Cannot save MBR";
}
The warning shown in the last line will in particular appear if you don't have read access to the device - you should make sure that you do, which usually means running the script as root.
What I have presented here has evolved from real day-to-day use over the period of three and a half years.
I found the system so useful that I still prefer it to buying a laptop. Not only has it saved the expense of buying costly gadgets, it is amazing how long the lifetime of a 'cheap' USB stick actually is. The most fragile part is the connector, for which a warranty is given (usually about 10000 plug-ins and pull-outs). Mine had cracked circuits, so I must have been past that - but it was easy to fix; all that was needed was a soldering iron. On another occasion, I accidentally forgot the stick in the laundry. After drying, it worked fine ever after. I don't think a laptop would survive comparable treatment: it is strange that more expensive things are usually also more fragile.
I hope that the many programming hints throughout these two parts will aid in modifying, to fit individual ideas and requirements - creativity is not as easily exhausted as money.
Talkback: Discuss this article with The Answer Gang
![[BIO]](../gx/2002/note.png)
