More...


Musings

BMRT

    Part I: Getting Started - Creating, Previewing, and Final Rendering of Simple Images
  1. Introduction
  2. User Tools - Renderers and Previewers
  3. Developer Tools - libraries, compiler, etc
  4. The Example Scenes
  5. The Input File - RIB format
  6. Basic Steps
  7. Shaders
  8. Closing
indent
© 1996 Michael J. Hammel
indent

1. Introduction

      A couple of years ago, right after Toy Story had been released, I began to gather as much information on computer graphics as I could find. At first I had been looking for general information. Later, when I found out such tools existed for Windows and Mac systems, I began to look around for various 3D rendering and modelling tools that would run on Unix systems. The first tool I found was POV-Ray, a tool that has been ported to many platforms including a number of Unix OS's. I also found a number of other tools such as Polyray and Radiance. Since I was very new to 3D tools I started with POV-Ray. It had a large amount of online information (much of which has been scaled back on the Internet), a large user base that frequented the comp.graphics.rendering.raytracing newsgroup, and it had printed texts available. This last item was the most important element to me. I needed documentation I didn't have to print off myself and that was fairly well organized. I tended to carry it around to read at lunch on work days.


Figure 1: A sample scene created using BMRT. The text was produced using the font3d tool, which can output RIB files.

      Not long after discovering POV-Ray I came across another tool called BMRT. BMRT is actually a set of tools that are compliant with the RenderMan Interface Specification. This specification is the same one used by PRMan, the tool used by Pixar to create Toy Story. Although I wanted to learn more about BMRT I really didn't have the background to understand how to use such tools. POV-Ray's documentation allowed me to learn some basics up front. After about a year of working on POV-Ray, along with continued research in other areas of computer graphics, I began to look once again at BMRT. I now better understand what it does. Its time to learn to use it.       In this first of three articles on BMRT I'll be describing the package contents and introduce you to the basics of how to use the BMRT tools. You should keep in mind that much of the terminology might be new to you and so the early introductions and descriptions might not make too much sense. I apologize for this, but describing such a powerful package as BMRT and the RenderMan Specification in one introductory article is not easy. Fear not, however. I'll be explaining all of the package contents in some detail further along in this article. This won't be a complete, all encompassing tutorial. But it should be enough to get you started. After you get done here, go order the RenderMan Specification from Pixar. It is a very well written and easy to follow description of what BMRT implements. It also provides the reference guide necessary to understand the C and RIB bindings to the RenderMan interface.

What is BMRT?

      BMRT stands for the Blue Moon Rendering Tools. It is a set of tools and libraries created by Larry Gritz, who now works at Pixar, that allow the previewing and rendering of 3D models and scenes. The rendering engines (programs) and static libraries (used to create applications that can output RIB files) are all compatible with the RenderMan Interface Standard developed by Pixar. RenderMan is not an actual piece of software, although many people use the terms RenderMan and PRMam (Pixar's software implementation of the RenderMan specification) interchangeably. It is a specification stating how a modeling system communicates with a rendering system. BMRT is an implementation of the rendering system with a static library provided for use with modeling systems, including stand-alone programs.
      BMRT's rendering tools support ray tracing, radiosity, area light sources, texture and environment mapping, programmable shading in the RenderMan Shading Language, motion blur, automatic ray cast shadows, CSG (Constructive Solid Geometry), depth of field, support of imager and volume shaders, and other advanced features. The toolkit also contains quick RIB previewers (using OpenGL and X11) to allow "pencil tests" of scenes and animations.

Current Release and Where to Get it

      At the time of this writing, February 22, 1997, the latest release of BMRT is 2.3.5. It is available from the BMRT Web site (http://www.seas.gwu.edu/student/gritz/bmrt.html). This site also contains example images and pointers to other RenderMan related sites on the Web. Larry only provides precompiled versions of the renderers and the RIB and shader libraries. He does, however, provide a set of shaders in source form along with their compiled versions. We'll discuss shaders a little later. Versions of BMRT are available for Larry doesn't expect to port BMRT to non-Unix style operating systems due to the logistics problems (access to machines, and so forth) inherint with cross-platform development. There is no planned port for the MkLinux distribution at this time. I don't know if he plans on working on a Digital Alpha or any other non-Intel Linux ports.

What the package contains

      The distribution comes complete with what might be considered as a set of user tools, a set of development tools, and documentation for both. Its not quite correct to refer to these as user or development tools due to the nature of the tools, but for this article such classification will help organize things a little better.

User Tools - Renderers and Previewers

      These are the executable programs in the package that allow users to render and preview images. There are 3 such programs: Its easiest to remember these tools as the ones you'll need to render draft or final versions of your scenes. The first two are generally used to render draft versions, the last to render your final scene. However, you don't create the scene files with these tools. Scene files contain the description of the objects that make up the scene. These files use a format called RIB, the RenderMan Interface Bytestream format. Scene files can be created by hand (not a common practice), by writing a C program that uses the developer tools described in the next section, or by modellers that can output files in the RIB format.
      RIB files describe the shape and positions of objects. They provide the geometry of a scene. They do not describe colors of objects, the texture on the surface of objects, nor any aspect of lighting in the scene. This information is referenced by the RIB by using shaders. Shaders are external files that describe the appearance of the objects in a scene. There are developer tools for creating and examining shader files.

Developer Tools - libraries, compiler, etc

      The developer tools in BMRT are actually a set of libraries and header files that are provided for users to create C programs that output RIB files or to parse shader source files. The user programs can be specifically designed for a given scene or set of frames or could be part of a more generalized modelling system, such as AC3D or SCED. Also included in the developer tools are programs for compiling shader source files into their .so format and for examining compiled shader files to find their types, parameters, and initial values.
      Shader source files look like ordinary C code. The source file is compiled into another format referred to as the .so file. The compiled .so versions are actually ASCII files. The .so extension might be a little confusing to users who are familiar with creating shared libraries, but these are not shared object files. They are plain text files.
Note that the distribution does not come with linkable libraries for the renderers.

Docs

      There are only two pieces of documentation that come with the distribution, however both are quite well written and very good refernces. The first is a detailed description of all the tools and how to use them. This is a very valuable reference for new users learning how to get the most out of the programs by learning their command line arguments. The second is a quick introduction to the RenderMan API. It contains a brief description of the RIB format. For more detailed information on the RIB format you should contact Pixar to get the official RenderMan Interface 3.1 Specification. Although the specification document is not written as a tutorial, it does contain detailed, reference-style information on the RIB file format. For more information on contacting Pixar, see the comp.graphics.renderman FAQ at http://www.cis.ohio-state.edu/hypertext/faq/usenet/graphics/renderman-faq/faq.html


2. User Tools - Renderers and Previewers

rendribv - wireframe previewer

      The first of the renderers, rendribv, provides wireframe previews of the input scene files. The previews show geometric primitives without shading or removal of hidden lines. A wireframe display uses "wire cages" to represent objects instead of representing them as solid surfaced objects. The wireframe display requires the use of the X11 windowing system. Rendribv has a number of command line options, all of which are explained in the accompanying documentation. One important aspect to keep in mind is that rendribv was designed to display one or more frames of a RIB file. It offers a good way to preview an animation without the overhead that accompanies the shading of object surfaces. The limbo.rib example scene provides a sample animation. On my 486DX2/66 with 40M memory the wireframe animation is fairly smooth using rendribv. Its even faster on my P75 laptop with 8M of memory.

rgl - quick polygon previewer that uses OpenGL

      Another previewer provided in the distribution is the rgl program. This renderer displays previews of scenes with simple Gouraud shading of object surfaces using OpenGL (OpenGL is a specification for a graphics interface from Silicon Graphics - see this months review of Mark Kilgards OpenGl Programming with the X Window System). Gouraud shading is a method for helping to eliminate large changes in color intensities that can cause banding. Hidden lines, those lines and surfaces that should not be visible to the viewer because they are blocked by other lines or surfaces, are also removed. Since rgl requires OpenGL, a port of an OpenGL library must be available on a particular platform in order for Larry to port rgl to that platform. Fortunately, the MesaGL library is available for Linux, as well as some commercial ports of the official OpenGL libraries, so there is a working version of rgl available for Linux. rgl is statically linked so you don't need any of the OpenGL or MesaGL libraries to use it. Other Unix distributions of BMRT may not have this program, however.

rendrib - hiqh quality renderer w/raytracing and radiosity

      This is the gravy on the potatoes. The rendrib program is a fully featured, RenderMan compliant renderer that provides not only the full feature set of the RenderMan Specification but also provides such things as ray tracing, radiosity, solid modeling, depth of field, motion blur, area light sources, texture mapping, environment mapping, volume and imager shading, and support of the RenderMan Shading Language. The latest version also supports displacement mapping, a method of mapping an image to a surface that not only changes the appearance of the surface but also the actual shape of that surface. Rendrib is the tool to use when rendering your final scene as it will produce the best, most realistic results of all the renderers provided.

A word about compatibility with commercial Linux distributions

      Version 2.3.4 of the BMRT rendering tools were built against version 26 of the g++ library. Version 2.3.5 is linked against version 27. This is no problem if you're running one of the newer commercial Linux distributions since I believe 27 has been out for awhile and should be in most recent Linux distrubtions. However, my laptop has an older Slackware 3.0 release which only has g++ v26. which means I can't run the v2.3.5 renderers on my laptop. This isn't a big deal for me, but it is something you should be aware of when deciding to explore BMRT. I don't know if Larry supplies older versions of BMRT so you may have to upgrade in order to use the latest distribution of BMRT.
      Note that the X and MesaGL/OpenGL libraries were statically linked to the renderers. However, the C/C++ libraries are still dynamically linked, which is why you need to be aware of which versions of these libraries are required.


3. Developer Tools - libraries, compiler, etc

slc - shader langauge compiler

      The shader language compiler is a program which takes shader language source files, those files ending in .sl, and compiles them into their compiled versions, those files ending in .so. The compiled shader files appear to be code to a state machine used in the rendrib renderer that determines how shading is applied to a given object (I don't know that for certain, but it seems a reasonable guess). RenderMan is a procedural interface. The shaders are procedures written in a C like language. The must be compiled to be used with a RenderMan compliant renderer like BMRT. The shader compiler turns the procedural shader into a format the renderer can handle.
      Shaders come in many forms: surface shaders which define how light leaving a point on an object will appear, volume shaders which define how light is affected as it passes through an object (such as the atmosphere), light shaders which describe the lighting of a scene, displacement shaders, transformation shaders, imager shaders, and so forth. rendrib supports all of these shader types.
      The BMRT package comes with a fairly large number of shaders, some of which are required by the RenderMan specification and some of which Larry has provided as bonus shaders in conjunction with example scenes.

RenderMan required shaders Extra shaders provided for use with example scenes
constant, matte metal, shinymetal plastic, paintedplastic ambientlight, distantlight pointlight, spotlight depthcue, fog bumpy, null background, clamptoalpha, dented, funkyglass, glass, gmarbltile_polish, noisysmoke, parquet_plank, plank, screen, screen_aa, shiny, stucco, wallpaper_2stripe, wood2,
arealight - shader for area light sources
Both compiled versions and source code are provided for all of these shaders.

Note that the .so files provided are the precompiled versions of the .sl files and that the .so files are not compatible with PRMan, Pixar's RenderMan program. The .sl source files are compatible, however. The reason for this comes from the methods used internally to rendrib and PRMan to produce the 3D images. For more information see the section on Incompatibilities with PRMan in the bmrt.html document in the doc directory of the distribution.

sotell - lists the arguments to a compiled shader

Another shader related tool is sotell. This program allows the user to parse a shader object file for its type, list of parameters, and default settings. What this is useful for will become more apparent in the next article which will cover the writing of shaders. We'll touch briefly on using predefined shaders a little later in this article.

libribout.a, ri.h - RenderMan library for producing RIB files

These two files are used by developers who need to write applications to output their RIB files. Remember, RIB files are the input files (including references to shaders) passed to the rendrib program. There are two modellers on Linux that can output RIB files for you, SCED and AC3D, but you may find it convenient to write your own specialized application to output a series of specific frames. In this case (or if you are ambitious enough to write your own modeller) you can link your program to the libribout.a library. Your application would use then be using the C binding to the RenderMan API. This API is described in limited detail in the poets.ps document in the distribution. A much better description can be found in Steve Upstill's The RenderMan Companion, published by Addison-Wesley. Developer's who write applications that use the RenderMan API will also need to include the ri.h header file in their source code.

libsoargs.a, so.h - argument parser for compiled shaders

According to Larry's documenation (which is all I have to go by - I've never seen the PRMan application myself), Pixar's PRMan distribution also comes with a linkable library for parsing compiled shaders, much like the sotell program does in the BMRT distribution. Since the compiled versions of the shaders differ in format Larry has provided a similar library for use by applications that need to parse his version of the compiled shader files. Applications which need this feature should include the so.h header file in their source code and link against the libsoargs.a library.

4. The Example Scenes

There are 8 example scenes in the distribution. These are described in the README file in the examples directory, but for completeness sake I'll list and describe them briefly here. The 8 RIB files are: Some of these are good examples for learning the syntax and structure of a RIB file, others are not. If you want to learn a little about the RIB ASCII binding you should start by taking a look at the following examples: The rest of the RIB examples are not well formatted (probably output from a modeller or a program linked with libribout.a). You really wouldn't want to examine the RIB file in these cases anyway, as their main purpose is to show features of the Shading Language. In these cases you should take a look at the shaders which they use. You'll have to look in the RIB to learn which shaders are important for a given example, however. For example, the tpdisp.rib file is an example of displacement shaders so you would look for the Displacement commands in the RIB file to find which displacement shader source files to examine.
      In order to explain how to use these tools in more detail I'll be using two examples in each of the rest of the sections of this article. In some cases I'll use examples I found in the RenderMan Companion. In other cases I'll use some of Larry's examples or some of my own extremely primitive examples. They aren't very good - but this article was is as much a learning experience for me as it is anyone else.

5. The Input File - RIB Format

What is it?

RIB stands for the RenderMan Interface Bytestream. It comes in both ASCII and binary encodings. We'll only be discussing the ASCII version since I have very little information about the binary encodings and BMRT doesn't come with any binary examples. All the example RIB files are ASCII formatted.
      A RIB file is nothing more than an ASCII text file made up of a series of RIB commands. These commands match their RenderMan API C function counterparts almost exactly (there a few exceptions according to the official specification). When you write a C program that makes calls to the RenderMan API via the libribout.a library what you get as output is the ASCII encoding of RIB. This is why its generally easier to use the C binding for RenderMan than to write your own ASCII RIB file.

A little about the format

The semantics of the two bindings (C and ASCII RIB) are very similar. Both take token/value pairs as arguments. The C binding requires that paremeter lists to functions be NULL terminated. The ASCII RIB format does not. The names of the C procedures are prefixed with Ri but the equivalent RIB commands are not.
      RIB files Support single or multiple frames of an image, allowing (as in the limbo.rib example) animations with a single scene description. This is a good case for using the procedural interface to RenderMan instead of hand coding the RIB file. Its much easier to compute the scene descriptions through a programmed loop than to hand compute each frame using the ASCII RIB commands.

How can you create RIB files?

There are three ways to create a RIB file for use as input to one of BMRT's renderers:
  1. By hand
  2. Write a C program using the RenderMan API and link with libribout.a
  3. Using a modeller
    There are three modellers currently available for Linux that can output RIB formatted files:
My impression is that few people create RIB files by hand except as examples in order to test shaders or something similar. The use of modellers on Linux is fairly new to the general public, so at this point I'm guessing many models are created by writing scene-specific programs linked with the libribout.a library. Note that developmental support for AC3D is ongoing, while AMAPI is reported to have dropped their Linux ports. SCED's status is unknown at this time. I've not seen any updates to it for about a year.
      Lets take a look at a couple of examples. The first is a simple RIB file from Larry's set of examples. The second is a simple animation in C source taken from the RenderMan Companion.

Working example 1a - A sample RIB file

The simplest example from the BMRT distribution to follow is probably shadtest.rib. It contains 3 textured objects (two spheres and a flat plane beneath them) along with a light source. The source is given in Listing 1.
##RenderMan RIB-Structure 1.0
version 3.03
Display "balls1.tif" "file" "rgba"
Format 480 360 -1
PixelSamples 1 1
Projection "perspective" "fov" 45
Translate 0 -2 8
Rotate -110 1 0 0

WorldBegin

LightSource "ambientlight" 1 "intensity" 0.08

Declare "shadows" "string"
Attribute "light" "shadows" "on"
LightSource "distantlight" 1 "from" [0 1 4] "to" [0 0 0] "intensity" 0.8

AttributeBegin
#  Attribute "render" "casts_shadows" "none"
  Color  [ 0.7 0.7 0.7  ] 
  Surface "matte"
  Polygon "P"  [ -5 -5 0 5 -5 0 5 5 0 -5 5 0  ] 
AttributeEnd

AttributeBegin
  Translate -2.25 0 2
  Color [1 .45 .06]
  Surface "screen" "Kd" 0.2 "Ks" 0.8 "roughness" 0.15 "specularcolor" [1 .5 .1]
  Sphere 1 -1 1 360
AttributeEnd

AttributeBegin
  Translate 0 0 2
  Declare "casts_shadows" "string"
  Attribute "render" "casts_shadows" "shade"
  Color [1 .45 .06]
  Surface "screen_aa" "Kd" 0.2 "Ks" 0.8 "roughness" 0.15 "specularcolor" [1 .5 .1]
  Sphere 1 -1 1 360
AttributeEnd

AttributeBegin
  Translate 2.25 0 2
  Declare "casts_shadows" "string"
  Attribute "render" "casts_shadows" "shade"
  Surface "funkyglass" "roughness" 0.06
  Sphere 1 -1 1 360
AttributeEnd

WorldEnd
Listing 1: shadtest.rib example from BMRT distribution

Items of interest in this file include:
  1. The values set before the WorldBegin command are used to set camera and display parameters. These global parameters are known as options. The display options can be specific to the renderer being used. Rendering options cannot be set inside the WorldBegin/WorldEnd commands.
  2. Values set inside the Attribute commands are referred to as current parameters and are object specific parameters such as lighting, opacity and surface colors and textures.
  3. Objects (including lights) created inside the WorldBegin/WorldEnd commands exist only inside those commands. They are not referencable outside of these commands.
  4. Notice how the RIB commands contain series of literal strings and numeric values. For example, the surface command is followed by the name of the surface (a string) followed by a series of token/value pairs. These tokens are variables known to the shader being called and the values are the ones we wish to set these variables to when the shader is invoked.
  5. The # sign is a comment, but the double # (ie ##) is a hint to the specific renderer. For all practical purposes, these are also comments, since no renderers use them for anything. I believe the format of the hint tag has changed for the 2.3.5 version of the BMRT renderers but I don't know what has replaced it.
  6. The commands to create the spheres are obvious. The command to create the plane is "polygon". The RenderMan API and BMRT provide support for a number of primitive shapes. BMRT also supports the ability to combine primitive shapes into more complex ones using what is known as Constructive Solid Geometry.
  7. The WorldEnd() command causes the scene to be output to the display.
  8. RIB commands may span multiple lines, although it doesn't show this in the example.
I removed the comment at the start of the file just to save a little space. You should read it and try rendering this example to get a feel for what it does. All I really wanted to do with this example is show you what an ASCII RIB file looks like. The format of the file gives a little clue as to the hierarchy of the commands: WorldBegin/End encompass the Attribute commands, which in turn encompass some objects and their textures and other descriptions. Understanding this hierarchy can help you see the scope of definitions such as objects or projections. This hierarchy can be more apparent when using the RenderMan API since the code is written in a structured language, C.

Working example 2a- A simple animation in C

The RenderMan Companion by Steve Upstill contains a fair amount of sample code that uses the C binding to the RenderMan Interface. Lets take a look at the source for one of these examples:
#include "
#define NFRAMES    10    /* number of frames in the animation */
#define NCUBES     5     /* # of minicubes on a side of the color cube */
#define FRAMEROT   5.0   /* # of degress to rotate cube between frames */

main()
{
   int frame;
   float scale;
   char   filename[20];

   RiBegin(RI_NULL);      /* Start the renderer */

      RiLightSource("distantlight", RI_NULL);

      /* Viewing transformation */
      RiProjection("perspective", RI_NULL);
      RiTranslate(0.0, 0.0, 1.5);
      RiRotate(40.0, -1.0, 1.0, 0.0);

      for (frame = 1; frame <= NFRAMES; frame++)
      {
			sprintf(filename, "anim%d.pic", frame);
         RiFrameBegin(frame);
            RiDisplay(filename, RI_FILE, RI_RGBA, RI_NULL);
            RiWorldBegin();
               scale=(float)(NFRAMES-(frame-1))/(float)NFRAMES;
               RiRotate(FRAMEROT * frame, 0.0, 0.0, 1.0);
               RiSurface("matte", RI_NULL);

               /* Define the cube */
               ColorCube(NCUBES,scale);
            RiWorldEnd();
         RiFrameEnd();
      }
   RiEnd();
}
Listing 2: shadtest.rib example from BMRT distribution

As you can see the hierarchy of commands is a little more evident. Of course, being an animation this is a more complex example. A distant light source is defined outside all frames of the animation. The type of camera projection is defined along with the initial viewing transformation. This is followed by the main loop which produces the frames of the animation.
      Inside the loop each frame is defined. The display is set to write to a file and the format of the output is set with RI_RGBA, meaning red, green, blue and alpha channels will be output (or in simpler terms 3 colors and 1 opacity level). How this is done is renderer specific.
      This particular example is simplified by the use of an external routine, ColorCube(), which actually defines the object geometry to be used. In this case a cube is being built by ColorCube() with its sides being colored. I left this routine as an exercise for the reader, mostly because I always wanted to say that to someone. For those who can't wait to figure out how to do it themselves, the code for ColorCube() is provided in the RenderMan Companion.

6. Basic Steps

So now we've seen what a RIB file looks like and how they can be created. We know we need a RIB file as input to the renderers provided in the BMRT distribution. We know that RIB files provide the geometry of a scene or set of frames and that shaders are referenced by the RIB files to provide texturing aspects to objects in those scenes.
      Ok, so now what do we do? Well, lets run through a full example of creating, shading, previewing, and final rendering of a single scene.

Create the RIB file

Here is a simple example I created on my own. It is C source that links with the libribout.a library. When run it produces a RIB file of a scene with a blue ball over a gray plane, lit by a single distant light source. The source is commented so you can see exactly what I did to create this scene. The C source is in the same directory as the examples (or any directory directly under the main directory of the distribution). To compile this program you would use the following command:
gcc -o example-2a -O example-2a.c -I../include ../lib/libribout.a
To run the command simply type
example-2a > example-2a.rib
At this point you have the ASCII RIB input file needed to feed to one of the rendering programs.

Preview the scene with rendribv and rgl

The first thing to do is examime the scene as a wireframe display to make sure all our objects are there. We won't really be able to tell if they are aligned properly (in front of or next to each other) but we'll be able to see if they have the correct basic shape and if they are within the field of view. To preview the scene use the following command: rendribv example-2a.rib
OK, everything looks as it should. We've got a sphere and a plane. Lets add some surfaces to the objects using rgl. The sphere should be a solid blue and the plane should be grayish.
      To preview the scene with rgl use the following command:
rgl example-2a.rib
Figure 2: wireframe output from rendribv

Full rendering with rendrib

Again, this is about right. The image you're looking at isn't great due to the way I captured the image and converted it to a GIF file. But the image is about what I was expecting. The plane is a bit dark. But lets see what we get from the high quality renderer.
      To preview the scene with rendrib use the following command:
rendrib example-2a.rib
Figure 3: output from rgl
Oh oh. The ball is well lit on top, but the plane is gone. Maybe it has someting to do with lighting.

Adjusting the lighting

In the sample source I set a distant light that sat on a line that stretches from <0.0, 10.5, -6.0> to <0.0, 0.0, 0.0>. This is allowing light to fall on only the top half of the ball, but doesn't explain why the plane isn't visible. Thats a different problem. The sample scene C source contains the following lines:
RiLightSource(RI_DISTANTLIGHT, RI_INTENSITY,
      &intensity, RI_FROM, (RtPointer)from,
      RI_TO, (RtPointer)to, RI_NULL);
Figure 4: output from rendrib
The variables from and to define the line on which the distant light exists. To make this light shine more on the front of the ball we can move the to point out to -600 on the Z axis. This lights up the ball much better, but the plane is still invisible. We can also increase the value of the intensity variable from 0.6 to 1.0.
      But whats wrong with the plane? Where did it go? The answer lies in the surface texture used.

Test with standard shaders

The original version of the sample scene used a matte surface shader for the plane. When rendered with the single distant light the reflectivity of the surface made it basically invisible from the angle of view that we had set with our initial translation.
A first guess was to try adding a spotlight above the surface, which can be seen in the updated version of the sample source. This had no effect, so I tried another shader - the same matte shader used on the sphere. Viola! The surface shows up, including the newly added spotlight. Way cool.
Figure 5: look boss - da plane! da plane!

Lets look at two more examples:
  • Another plain sphere over a plane with a back wall
  • Same scene with textured surfaces
The RIB file for example-4a is probably more simplistic than the example-2a but with better results. The difference is the use of well placed spotlights. Notice the way the spotlight is defined:
   LightSource "spotlight" 1 "from" [1 3 -4]
     "to" [0 0 0] "intensity" 15

This is just like the distant light used in example-2a. This time two lights are used, and they are spotlights instead of a distant light. The effect of well placed spotlight shows in the realism of this image.

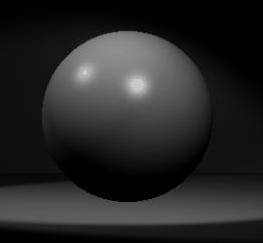
Figure 6: example 4a.jpg

The next image is a little hard to see. I didn't have time to adjust the brightness (well I tried using xv but it kinda mucked up the image and I didn't have time to rerender Paul's RIB file). What it shows is the same scene as Figure 6 except this time textures have been applied to the sphere, the wall and the floor. The texture on the sphere is a glass stucco. The floor has a wood texture and the wall has a wallpaper effect. The sphere is interesting in that it uses a glass surface shader with a stucco displacement map. The displacement map alters the actual shape of the sphere causing the slightly bumpy effect that is (somewhat) visible in Figure 7. All of the textures are apparent from examination of the RIB file. All of the shaders used in this example are available in the 2.3.5 release of BMRT. It is left as an exercise for the reader to rerender and adjust for the darkness of the image. (Thats also something I always wanted to say.)

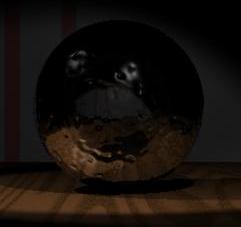
Figure 7: example 4b.jpg

At this point there are only two things left to do:

Simple enough. Except the first one of these will take up an entirely seperate article. Next we'll introduce you to what shaders are without going into depth on how to write them. Stay tuned next month when we'll cover how to write shaders.

7. Shaders

What exactly is a shader?

According to to the RenderMan Companion,
A shader is the part of the rendering program that calculates the appearance of visible surfaces in the scene. In RenderMan, a shader is a procedure written in the RenderMan Shading Language used to compute a value or set of values (e.g., the color of the surface) needed during rendering.
In my language: a shader puts the surface on an object.

How does it fit into a RIB?

The shaders are external procedures referenced at rendering time by the rendering engine (in BMRT that would be rendrib). The C binding to RenderMan calls a shader with the RiSurface call. The following lines in the sample source used in the previous section apply the matte surface shader to the sphere and plane:
RiSurface("matte", RI_NULL); .
This causes the following line to be added to the ASCII RIB file output by the program when it is linked with libribout.a:
Surface "matte" .
Obviously things can get much more complex than this. But at least you'll have some way of identifying the shaders in the example scene files.

Compiling a shader

You should keep in mind that the shaders you write in the RenderMan Shading Language have to be compiled before they can be used. Compiling shaders is very straightforward. To compile the matte.sl shader into the matte.so file you would use a line like:
slc matte.sl .

7. Closing

There aren't that many resource devoted to BMRT or RenderMan on the net just yet. Most can be found by starting at The RenderMan Repository - (http://pete.cs.caltech.edu/RMR/index.html). There is also a good collection of RenderMan shader information at RManNotes - (http://www.cgrg.ohio-state.edu/~smay/RManNotes/index.html).
      So, thats about it. You've seen the basics. You've been introduced to the tools. Now you just have to do something with them. Larry's BMRT Web pages contain links to intersting images created with BMRT. That should provide some motivation. I'll be playing with it all next month trying to learn about the RenderMan Shading Language for the April Graphics Muse column. If you come up with anything interesting feel free to drop me a note.

indent
Ordering information:
Pixar Animation Studios
Attn: Katherine Emery
1001 W. Cutting Blvd.
Richmond, CA 94804
Specify you are ordering the "RenderMan Specification". It costs $20US. Note: I have no association with Pixar (but I can dream, can't I?).
Upstill, Steve The RenderMan Companion A Programmer's Guide to Realistic Computer Graphics. Addison-Wesley 1992
The RenderMan® Interface Procedures and RIB Protocol are © Copyright 1988, 1989, Pixar. All rights reserved. RenderMan® is a registered trademark of Pixar.

Blue Moon Rendering Tools are © Copyright 1990-1995 by Larry I. Gritz. All rights reserved.

indent
© 1996 by Michael J. Hammel